Appearance
nginx 配置ssl
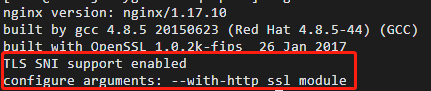
- 查看nginx是否安装支持ssl的模块(如果没有红框里的内容,则需要安装)
nginx -V
1
- nginx 安装ssl模块
找到nginx原始目录(刚下载的nginx包解压后的目录),执行以下命令
./configure --with-http_ssl_module
# 不要make install,否则会覆盖原有安装内容
make
1
2
3
2
3
make完后objs目录下会多个nginx,这是新版本程序
- 备份旧nginx程序
cp /usr/local/nginx/sbin/nginx /usr/local/nginx/sbin/nginx.bak
1
- 新nginx程序覆盖
cp objs/nginx /usr/local/nginx/sbin/nginx
1
- 申请ssl并配置,这是阿里云的文档
https://developer.aliyun.com/article/774963?spm=a2c6h.13813017.0.dArticle738638.6ab04fbbFzscfT
- 在nginx.conf或其他能加载到nginx.conf里的*.conf文件,添加以下内容(域名、pem/key文件换成自己的)
js
server {
    listen 443 ssl;
    server_name ***.com;
    root /html;
    if (!-e $request_filename) {
        rewrite ^/(.*)$ /index.php?s=/$1  last;
    }
    location ~ .*\.php(\/.*)*$ {
        fastcgi_pass   127.0.0.1:9000;
        include       fastcgi.conf;
        fastcgi_index  index.php;
    }
    ssl_certificate  cert/111111_www.***.com.pem;
    ssl_certificate_key cert/111111_www.***.com.key;
    ssl_session_timeout 5m;
    ssl_ciphers ECDHE-RSA-AES128-GCM-SHA256:ECDHE:ECDH:AES:HIGH:!NULL:!aNULL:!MD5:!ADH:!RC4;
    ssl_protocols TLSv1 TLSv1.1 TLSv1.2;
    ssl_prefer_server_ciphers on;
}
1
2
3
4
5
6
7
8
9
10
11
12
13
14
15
16
17
18
19
2
3
4
5
6
7
8
9
10
11
12
13
14
15
16
17
18
19
Composer安装thinkphp5.0 验证码
- Linux 安装composer
https://www.runoob.com/w3cnote/composer-install-and-usage.html
1
- 安装:
在项目目录下执行,安装的扩展包目录为 项目名/vendor/topthink/
# 5.0 版本的安装命令
composer require topthink/think-captcha=1.*
# 5.1 版本的安装命令
composer require topthink/think-captcha=2.*

注意:不能省略后面的1.*或2.*,否则会报错。
1
2
3
4
5
6
2
3
4
5
6
Centos7 PHP安装
yum 默认安装的PHP版本是5.4,有点低,打算把它升级到7.2。
- 更换RPM源
CentOs 7.X:
rpm -Uvh https://mirror.webtatic.com/yum/el7/epel-release.rpm
rpm -Uvh https://mirror.webtatic.com/yum/el7/webtatic-release.rpm
1
2
3
2
3
- 为避免不必要的麻烦删除低版本的PHP相关包
yum remove php*
1
- 安装7.2版本
yum install php72w php72w-cli php72w-common php72w-devel php72w-embedded php72w-fpm php72w-gd php72w-mbstring php72w-mysqlnd php72w-opcache php72w-pdo php72w-xml php72w-ldap php72w-mcrypt
1
- 启动PHP服务
systemctl start php-fpm
1
- 加入开机自启项
systemctl enable php-fpm
1
- 在nginx.conf文件中增加对PHP的支持
vi /usr/local/nginx/conf/nginx.conf
1
- 进入编辑模式后新增如下配置
if (!-e $request_filename) {
    rewrite ^/(.*)$ /index.php/$1 last;
}

location ~ .*\.php(\/.*)*$ {
    fastcgi_pass 127.0.0.1:9000;
    include fastcgi.conf;
    fastcgi_index index.php;
}
1
2
3
4
5
6
7
8
9
2
3
4
5
6
7
8
9
修改后按下ESC键,输入:wq保存并退出Vim编辑器。
重启PHP和Nginx服务
systemctl restart php-fpm
nginx -s reload
1
2
2
在/usr/local/nginx/html/目录下新建一个.php文件 增加
保存后查看结果
Centos7 NGINX增加开机自启项
- 查看开机自启项是否有nginx
systemctl list-unit-files | grep enabled
1
- 如果结果无,则执行以下操作,为了端口号冲突等不必要的报错,先停止nginx服务
nginx -s quit
1
- 创建文件并打开,写入以下内容(注意路径):
vi /usr/lib/systemd/system/nginx.service
1
[Unit]
Description=nginx
After=network.target

Type=forking
ExecStart=/usr/local/nginx/sbin/nginx
ExecReload=/usr/local/nginx/sbin/nginx -s reload
ExecStop=/usr/local/nginx/sbin/nginx -s quit
PrivateTmp=true

[Install]
WantedBy=multi-user.target
1
2
3
4
5
6
7
8
9
10
11
12
2
3
4
5
6
7
8
9
10
11
12
然后按esc :wq 退出保存
设置开机自启动
systemctl enable nginx.service
1
- 启动nginx
nginx
1
- 再查看自启项列表
systemctl list-unit-files | grep enabled
1
Centos7 NGINX 安装
- 安装Nginx运行时所需要的插件
# 编译器
yum -y install gcc
# 解析正则表达式
yum install -y pcre pcre-devel
# 数据包gzip压缩和解压
yum install -y zlib zlib-devel
1
2
3
4
5
6
2
3
4
5
6
- 下载并解压
# 下载
wget http://nginx.org/download/nginx-1.17.10.tar.gz
# 解压
tar -zxvf nginx-1.17.10.tar.gz
1
2
3
4
2
3
4
- 编译并安装
cd nginx-1.17.10
./configure
make && make install
1
2
3
2
3
- 启动或生成软链接启动
# 启动
/usr/local/nginx/sbin/nginx
# 生成软链接后可直接用nginx启动
ln -s /usr/local/nginx/sbin/nginx /usr/sbin/nginx
1
2
3
4
2
3
4
- nginx默认访问路径
/usr/local/nginx/html/
1
Centos7 MySQL 忘记密码
- 命令查找my.cnf文件
find / -name my.cnf
1
- 打开my.cnf文件
vi /etc/my.cnf
1
- 在文件中添加一行,保存并关闭文件
skip-grant-tables
1
- 重启MySQL服务
systemctl restart mysqld.service
1
- mysql 命令进入mysql,以下是mysql的操作命令
use mysql;
update mysql.user set authentication_string=password('新密码') where user='root';
flush privileges;
quit;
1
2
3
4
2
3
4
- 再打开my.cnf文件
vi /etc/my.cnf
1
- 把文件中添加的 skip-grant-tables 注释或删除,保存并关闭文件
# 注释或删除该行
skip-grant-tables
1
2
2
- 重启MySQL服务
systemctl restart mysqld.service
1
Centos7 MySQL安装
- 下载并安装,默认版本5.7
wget http://dev.mysql.com/get/mysql57-community-release-el7-10.noarch.rpm
yum -y install mysql57-community-release-el7-10.noarch.rpm
yum -y install mysql-community-server
1
2
3
2
3
- 启动MySQL服务
systemctl start mysqld
1
- 查看MySQL初始密码
grep "password" /var/log/mysqld.log
1
- 登录数据库
mysql -uroot -p
1
- 修改默认密码
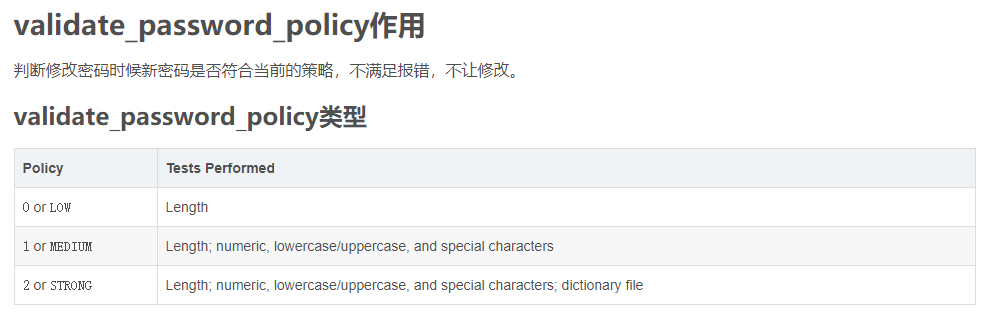
# 修改密码安全策略为中(校验密码长度、数字、大小写、特殊字符)
set global validate_password_policy=1;

ALTER USER 'root'@'localhost' IDENTIFIED BY '*********';
GRANT ALL PRIVILEGES ON *.* TO 'root'@'%' IDENTIFIED BY '*********;
1
2
3
4
5
2
3
4
5
- exit退出数据库